Project Settings
The Projects page allows Admins to configure the following project properties:
- Project Fields - choose which fields to display in the project overview.
- Dashboard - choose which fields to display in the homepage dashboard.
- Project Approval - choose which user(s) can approve projects.
- Add User to all Projects - quickly add a user to all existing projects
- Status Labels - choose which labels are to identify a project status.
- Project Codes - enable/disable a unique project code.
- Project Template - TBD
- Dependency Shifting - choose how Flavor Studio handles changes to project events.
Project Fields
The Project Fields section allows Admins to select additional fields to display in the projects page:
- Volume (lbs) - a numeric value.
- Revenue - a dollar value.
- Type - the type of project. Available options are Custom, Branded or None.
- Project Leader - choose from the project team members.
- $/lb - a calculated value.
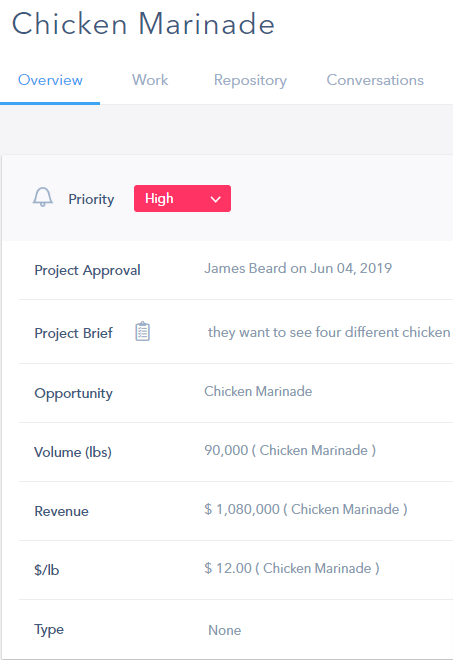
The project team leader icon , if enabled, will appear to the right of the avatar of the project leader:

Example
The image below show how the project fields appear on the project page:
Dashboard
The dashboard section allows Admins to choose which fields to display in the homepage dashboard:
- Project Name
- Sales Person
- Customer
- Status - see the Status Labels section below
- Start Date
- Due Date
- Age
- Progress - a percentage
- Priority - options are Low, Medium and High.
- Volume (lbs) - a measure of mass.
- Revenue - a currency value.
- Type - the available options are Custom, Branded or None.
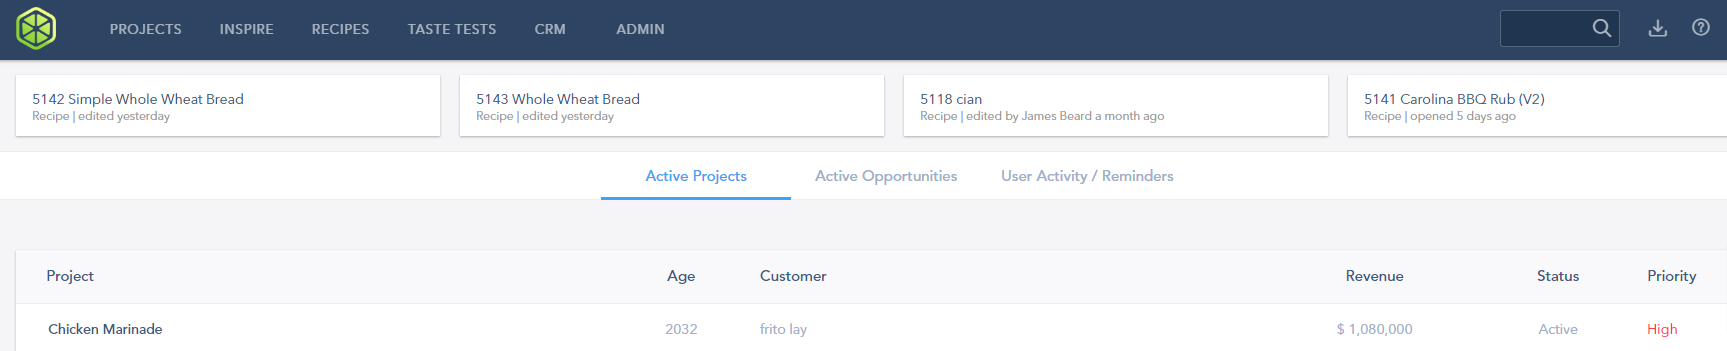
Example
The image below shows the project homepage dashboard fields:
Project Approval
Admins can enable this option to have new projects approved by one or more designated Approvers. No actions can occur on a project with this option enabled until it has been approved.
Approvers also receive reminders on the home page when they log in to Flavor Studio.
To add a user to the list of authorized approvers:
- Hover over the ADMIN menu item and click Projects.
- Click on Project Approval navigation menu item, or scroll down to Project Approval.
- Click on
- A list of the active users in the organization will open.
- Search or scroll for the user to add.
- Hover your mouse on the right side of the row for each person and you will see a gray check mark appear.
- Click the check mark.
- Click SAVE.
Add User to all Projects
This feature is useful when, for example, you have a new person joining the team and you wish to quickly add them to all existing projects.
Note: Adding a user to all projects cannot be undone. If this inadvertently happened, the only way to undo the mistake is to a) make the user inactive or b) edit each project team and remove the incorrect user.
To quickly add a user to all projects:
- Hover over the ADMIN menu item and click Projects.
- Click on Add user to all projects left side navigation menu item, or scroll down to Add user to all projects.
- Click on Add user to all projects.
- A list of users will open.
- Search or scroll for the user to add.
- Hover your mouse on the right side of the row for each person and you will see a gray check mark appear.
- Click the check mark.
- Click SAVE.
Status Labels
Status Labels allows Admins to customize the status labels to align with an organization’s existing language. Statuses can be added or removed, made visible on the dashboard or not, or re-ordered just by dragging and dropping.
- Active
- Archived
- Canceled
- Completed
- Kitchen
- Not Started
- On Hold
- Production
Project Codes
Project Codes gives Admins the ability to automatically append project names with a unique numerical code. The code takes the following format:
[last two digits of the year]_[Julian Date]_[project count for the day]
Examples
The first project created on Monday, October 30, 2023 (the 303rd day of 2023) will receive the project code: 23_303_01.
The second project created that day will be given project code: 23_303_02.
Project Template
TBD
Dependency Shifting
Allows Admins to choose how Flavor Studio treats changes to dependent events. There are two options:
- Relative - changes cascade through all subsequent events.
- Absolute - changes apply to a single event.
Examples