User/Group Management
Add, edit, and delete users and user groups
Manage the list of users who have access to your Flavor Studio account
Users
To add, modify, activate/deactivate or delete users, you must have Admin level permissions.
Users can be assigned one of three different levels of permission:
- Admin
- Premium
- Professional
Users are not identified by their email addresses; it is possible to change a user’s email address. See the Edit Users section below.
Note: As a precautionary measure, if you are the last user who has the Admin permissions, you cannot delete yourself.
User Level Permissions & Features
Admin
Administer (create, edit, activate/deactivate, delete, change permission level) users and groups.
Users with Admin level permissions have access to the five main modules in the top navigation in addition to the separate Admin menu of settings:
Premium
Users with Premium level permissions have access to all of the modules except the Admin menu.
Users with Premium level permissions receive everything in the Professional level and:
- Unlimited Inspire Collections
- Unlimited Recipes
- Unlimited Nutrition Labels
- Unlimited Taste Test Surveys
- R&D tax credit reporting
- Continuous updates and new features
Professional
Users with Professional level permissions only have access to the Projects and CRM modules.
The Professional set of permissions is appropriate for project managers, business development or front-line sales.
Professional level users receive:
- Unlimited Project Repository Storage
- Unlimited Project Tasks
- Unlimited Messages
- Secure end-to-end encryption
- 24/7 support (email/messages/phone)
- Fully integrated CRM
User Status: Active | Inactive | Pending
Ensuring that your users are active or inactive is very important when it comes to security and billing. Inactive users cannot log in to Flavor Studio.
Billing per User – monthly plan only
If you chose monthly billing, you will only be charged for each month’s active users.
Pending Status
A newly created user will have Pending status until that person logs in for the first time, at which point their status will change to Active. Any user with Pending status is included in billing charges.
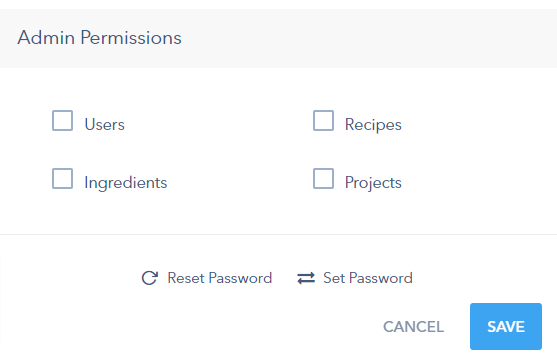
Special Admin Permissions
Once a user has been created, an Admin can assign special administrative permissions to that user, without regard to the permission level they have been assigned. You can give that user permissions to modify:
- Users
- Recipes
- Ingredients
- Projects
In this article:
- Add users
- Edit users
- Deactivate/Activate users
- Delete users
- Setting or Resetting Passwords
- Create user groups
- Add users to a group
- Edit user groups
Add users
You can add as many users as you need. To add a new user:
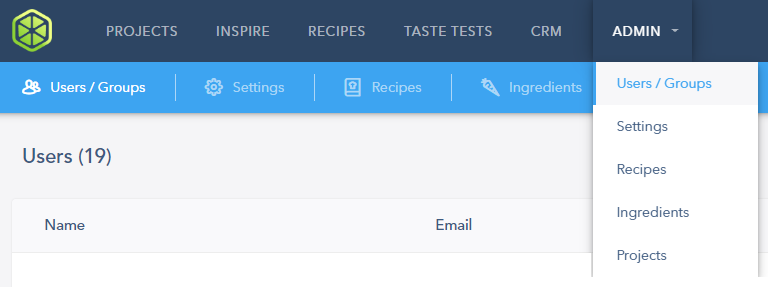
- Click the ADMIN menu item, or hover over the ADMIN menu item and click Users / Groups.
- In the upper right area of the screen, click New User.
- You can set a picture (avatar) for each user (optional), or it can be left to the user to choose one.
- Enter the user’s name (first and last), and their email address.
- Select the permissions you want. Learn more about permissions above.
- Choose the user’s department (optional).
- Click SAVE.
Edit users
Users with Admin level permissions can modify any of the user’s information including email address. This can be a very useful feature in the event that an employee leaves and their work needs to be assigned to a new employee. Another use case would when a company's name and domain name changes.
IMPORTANT: Any time a user’s permissions have been edited, that user must log out and then log back in for the changes to be seen.
The Edit functions include assigning special Admin permissions and resetting a user’s password.
To modify permissions for an existing user:
- Click the ADMIN menu item, or hover over the ADMIN menu item and click Users / Groups.
- Use the search box at the top right of the list to find the user you want. Enter a full or partial name or email address (e.g., jam or beard or @pizza). Alternatively, you can scroll through the list of users until you find the user you want to edit.
- Click anywhere in the row for the desired user. At the top of the screen you will see a label with the number of users and, beside it, one or two icons:

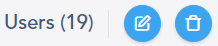
Note: If the selected user is an Admin, or if the user's status is Pending or Active, the Delete (garbage can) icon will not appear.
- Double-click the row, or click on the edit icon (the pencil in a square).
- Make the required changes.
- Click SAVE.
Note: This is also the screen that Admins can use to set or reset a user’s password.
Deactivate/Activate a user
Deactivating is important not only for security, but for billing, regardless of the billing plan chosen
Note: You cannot set a user to Pending status. This is a system-only status.
To make a user inactive (deactivate) or to make a user active:
- Click the ADMIN menu item, or hover over the ADMIN menu item and click Users / Groups.
- Use the search box at the top right of the list to find the user you want. Enter a full or partial name or email address( e.g., jam or beard or @pizza). Alternatively, you can scroll through the list of users until you find the user you want to edit.
-
Click anywhere in the row for the desired user. At the top of the screen you will see a label with the number of users and, beside it, one or two icons:
Note: If the selected user is an Admin, or if the user's status is Pending or Active, the Delete (garbage can) icon will not appear.
- Click on the edit icon (the pencil in a square).
- Set the user's status to either Active or Inactive.
- Click SAVE.
Delete users
Deleting a user is an irreversible process. All of the user’s data will also be deleted. However, Flavor Studio allows Admins to transfer the user’s data to a new user during the deletion process.
IMPORTANT: A user can only be deleted after their status has been changed to Inactive.
To delete a user:
- Click the ADMIN menu item, or hover over the ADMIN menu item and click Users / Groups.
- Use the search box at the top right of the list to find the user you want. Enter a full or partial name or email address( e.g., jam or beard or @pizza). Alternatively, you can scroll through the list of users until you find the user you want to edit.
- Click anywhere in the row for the desired user. At the top of the screen you will see a label with the number of users and, beside it, one or two icons:
- If the icon that looks like a garbage can does not appear, then check to ensure that the selected user’s status is set to Inactive.
- To set the user to Inactive, double-click on the user’s row and then change their status to Inactive. Click SAVE.
- Click on the Delete icon (looks like a garbage can):

- A dialog will appear warning that deleting a user will result in that user’s data being deleted. You can transfer that user’s data to one other user in the steps that follow.
- Click NEXT.
- This step gives Admins the opportunity to choose which data will be transferred. Each data category includes a count of the number of items in that category belonging to the selected user. Note that any data that is not selected for transfer will be permanently deleted. Click on the checkbox next to each data category in order to transfer it to the user selected in the next step.
- Click NEXT.
- This step allows Admins to choose the recipient of the transferred data. The data to be transferred cannot be distributed to more than one user. Scroll through the list of users to select the recipient.
- Click NEXT.
- This is the final confirmation. Please read it carefully.
- If you are sure you wish to proceed, click TRANSFER AND DELETE.
- Finally, the transfer (if chosen) and deletion are completed successfully.
- Click
Setting or Resetting Passwords
Users with Admin level permissions can set or reset a user’s password in the event that the user forgets their password. What is the difference between set and reset?
Set Password
If you choose this option you can simply type in a new password, as long as it meets the criteria for passwords. You would then transmit that information to the user. This is a quick but less secure method of helping your users.
Reset Password
If you choose this option, the system will send an email to the user with a link to select a new password.
Groups
Create user groups
You can create user groups to organize teams within your organization. Groups allow you to more easily collaborate and communicate. You can create as many groups as you want. You can set a picture (avatar) for each group (optional).
To create a group:
- Click the ADMIN menu item, or hover over the ADMIN menu item and click Users / Groups.
- Click on the two-person (groups) icon near the search box:

- To the right of the groups icon, click on the New Group button.
- A dialog window will open.
- At the top of the window, enter the name of the new group.
- You can set a picture (avatar) for the group (optional).
- Search or scroll for the user would like to add.
- Hover your mouse on the right side of the row for each person and you will see a gray check mark appear.
- Click the check mark to add the user to the group..
- Click SAVE.
To Add or Remove Users from a Group:
- Click the ADMIN menu item, or hover over the ADMIN menu item and click Users / Groups.
- Click on the two-person (groups) icon near the search box:

- A list of all groups will appear.
- Click on the group to which you would like to add users, or to the right of the groups icon, use the search field to find the correct group.Click anywhere in the row for the desired user.
- At the top of the screen you will see a label with the total number of groups and, beside it, two icons:
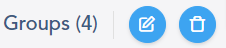
- Click on the edit icon (the pencil in a square).
- To remove a user from this group, click the green check mark to the right of the user’s name.
- To add a user to the group, search or scroll for the user you would like to add.
- Hover your mouse on the right side of the row for each person and you will see a gray check mark appear.
- Click the check mark to add the user to the group.
- Click SAVE.
To Delete a Group:
- Click the ADMIN menu item, or hover over the ADMIN menu item and click Users / Groups.
- Click on the two-person (groups) icon near the search box:

- A list of all groups will appear.
- Click on the group to which you would like to add users, or to the right of the groups icon, use the search field to find the correct group.Click anywhere in the row for the desired user.
- At the top of the screen you will see a label with the total number of groups and, beside it, two icons:

- Click on the delete icon (the garbage can).
- A confirmation dialog box will ask you to confirm deletion.
- Click OK.